Thursday 20 December 2012

Jewellery inductions, part two: Plastics

So, we had the second of our three days in the jewellery rooms at college this week.

Day two was plastics.  Specifically, acrylic, and vacuum form plastic.

I don't like the vacuum form.  Although I can see that it's very lightweight, (therefore good for millinery), and the process of shaping it over a mould is interesting, I just don't like the material.  It reminds me too much of packaging, I suppose, or of milk bottles or something like that.  I do quite like the matt side of the plastic (there are two sides, one matt, one shiny).  But not enough to get me past the fact I feel like there should be a milkshake inside it.

Vacuum formed plastic (high density polystyrene)


The flocking is interesting, but that reminds me too much of the Sylvanian Families bears I used to get from Fenwicks toy dept. in Newcastle, when I was a kid.
Vacuum formed face, after being flocked - ad the mdf mould that it was formed over (on the right)

The face mould was used to vacuum form these two pieces - using the different sides of the plastic - on side is shiny and one matt, and you can choose which to use.  I find the face in the matt a bit creepy, because it's a similar texture to skin. 


The acrylic, on the other hand, I love.  I really want to try to incorporate some of that somewhere in my final designs.  I think I like that there are more effects that you can get from it, and that you can polish it to a high shine.

I suppose I'm also coloured by the things I'm associating that with - I have a few vintage lucite reverse carved (intaglio) brooches.  And, of course, another name for acrylic is lucite...

A reverse carved lucite brooch
I love the way you can layer up the sheet acrylic, and drill into it and add acrylic rods of different colours, and the fact that you can use the laser cutter on it.  And that you can carve into it, and paint from behind (as in my brooches).

Layers of acrylic sheet laminated together to create a larger block


My laminated block of sheets, with short lengths of acrylic rod pushed into holes I drilled.


I also *really* like the acrylic rod - that you can put it in the oven and soften  it to make a shape, or that you can use it with a heat gun, to topically soften areas.  I found a few vintage pieces on google that must have used the same sort of process.


These would be sooooo easy to replicate for use as hat trimmings!  Or as the whole hat / headpiece, come to think of it.


Friday 30 November 2012

Jewellery Inductions and Workshops.

Week One: Metals (specifically copper).


We're having our inductions into the jewellery (or jewelry, if you're American!) workshops for the next couple of weeks.  

I've been looking forward to this part of the course!

This week we were looking at things you can do with copper - and the processes you go through to use it.  These apply to most of the metals we might choose to use, but copper is relatively cheap, obviously, so good for practising and potentially mucking up.


First we used the torches to anneal the metal (i.e. heat it till it glows).  That alters the molecular structure of the metal, making it soft enough to work with.  Then you quench it with water (some metals have to be allowed to cool slowly, I've read since, but copper is fine quickly cooled in a bowl of water).  It's amazing how quickly the water makes the metal going from glowing so hot that it would burn you, to cold to the touch, just by dunking it into a bowl of cold water.


M. annealing her metal.


Then we 'pickled' the metal in a tub of weak sulfuric acid solution to remove (or in some cases partially remove) any blackening and charring caused by the flame, that might stain the metal when working on it (if making a final piece you'd be more careful to remove it all, obviously, unless you wanted actually to keep some), and the metal was ready to work with.

The annealing and pickling makes the copper turn a really pretty shade of pink.


When we finished with the metal, Liz, the tutor, showed us the various tools, and some of the processes that you can use on the metal.  The main ones were the letter and number punches, the metal rollers, and what I called, when I got home, the 'domey-blocky-thingy' (actually a doming / dishing block).  

The thing that caught my interest first was the metal rollers.  High pressure steel rollers, operated by hand, and a bit like a pasta machine, in that by gradually tightening the rollers, and re-rolling the metal through them, you can stretch and thin the metal.  Apparently down to foil-like thinness.

The word that caught my attention, though, was 'embossing'.  By rolling the annealed metal through the machine with another material laid on (or under) it, you can impress the design of the other material onto the surface of the metal.

I spent most of the next part of the session embossing things.  Here are my results:

I used a different material on each side of this piece - on this side, the spine-like design was pressed into the metal by a piece of paper cut to that shape.

On the back of the 'spine' piece I used a piece of hessian - the hessian was completely destroyed by the pressure of the machine, but I really like the use of the two together.


I laid a piece of sequin waste (the foil-y stuff with the holes in it) over this piece.  

The back of the sequin waste piece - I like this side as much as the 'right' side - the texture is a lot different.

I love this piece.  This pattern came from a skeleton leaf.  I thought it was amazing that something so fragile and delicate could leave such a clear impression on a piece of metal.

I embossed this one with a piece of lace (before I cut out the discs).  Not such a clear impression this time,  but I think it looks a bit like bark.  One of my classmates later coloured a similar patterned piece black, and lightly sanded the surface, and it looked incredible.


Next up came the jewellery saws and the drill.  

The saws are a bit - well, a lot - like woodworking coping saws, except that if you want to turn you turn the work, not the blade.  You have to turn the work and not the blade, because the blades are so delicate and fine that if you try to turn them, they snap pretty much straight away.  As I very quickly found out....  Twice....  

I found the sawing to be quite difficult - I'm used to sawing more substantial things where you have to put pressure onto the blade - with this, if you apply any pressure, the blade sticks, and snaps.  The key is to relax, and let the teeth of the blade do all the work.  I started to get the hang of it.

The drilling, to get a start point for cutting shapes out of the metal was much easier.  The drill even has a foot pedal to operate it, just like a sewing machine, so that was much more familiar!

I didn't draw a shape onto my metal, just randomly cut bits off / out:

My randomly cut piece of copper.


Next up was soldering.  Now I have soldered before.  I (very briefly) took electronics at school, and my Dad was a bit of an electronics geek, so he taught me how to solder.  But jewellery soldering is completely different.

For a start, you use silver solder, not soldering wire, so that you don't lose the hallmarking of pure silver on a silver piece of jewellery.  For another, this way is stronger.

So, we mixed up a bowl of borax, which comes in a cone like sugar in the 18th century, and which you grind with water to a paste that looks like milk.  The you squash the silver solder in the roller, and cut it up into teeny pieces, which you drop into the borax bowl.  

My bowl of borax solution, cone of borax, and squashed piece of silver solder.

Then to brush the borax solution over the surfaces to be bonded, and use the paint brush to add little bits of solder along the seam.

The solder will melt into the seam, and the borax stops the surfaces from carbonising and getting nasty mucky-looking staining stuck in the soldering, where you can't get at it to remove it.


M. heating her soldering

E. melting her solder.

And then it's back into the pickle pot.  This is how mine turned out (bit rubbish, but an ok first attempt at something that's a lot trickier to do than you think it will be).


My little mini soldered table!

Looks ok this side.

Bit of a mess of dodgily applied solder on this side, although I think it's because it moved when I put it onto the hearth.


That was pretty much the end of the day, but I didn't have to go for a while, so I caught up on some stuff I didn't have time to do earlier.

I stretched a piece of copper in the roller - the one on the right started about the same size as that on the left.

I cut out some discs (after getting the die stuck, because it didn't occur to me to take it out  the bottom (duh)).

I used the 'blocky-domey-thingy to hammer out some discs into domes.

I used the domey-blocky-thing to hammer out a couple of domes on patterned metal - using wooden tools on one (right), and steel tools on the other (left), to see what the difference would be.  ( I knew already that wooden ones protect the pattern, because the wood is softer, but I wanted to see for myself what the difference is.)


I think the thing that most caught my imagination through the whole day was the roller.    The whole concept of pressing a design into the surface of the metal, and the idea of rolling it to whatever thickness you want it to be.  But I think that the embossing (or a combination of thinning and embossing) might have possibilities I should think about for my final collection - some of the results make me thing of fossils quite a lot - and the one with lace reminds me of some fossilised tree bark...


Definitely a worthwhile and interesting day.  Can't wait for plastic next week!

Wednesday 28 November 2012

The Knitting and Stitching Show, and some new hats.

I went to the Knitting and Stitching show at Harrogate last Saturday.  I worked in the college stand for a few hours, and then had a brief look around.  

There were a handful of stands that I wanted to look at / needed to get some supplies from, so I didn't spend that much time aimlessly wandering about, unlike at last years show.  The things that struck me, and that when I have time I'd like to try playing with, were some of the massive hanks of thick yarns, or textured yarns.  I think that you could do something really interesting with those (but I need a little practise first!).

Hats on display at Knitting and Stitching Harrogate 2012 (mine are the cloche, the black leather one, and the barely visible black suede one at the back). 

Hats on display at Knitting and Stitching Harrogate, 2012 (the cloche, leather and feathers, and the black suede at the back are mine).


The college stand at Knitting and Stitching Harrogate, 2012

Knitting and Stitching 2012

Knitting and Stitching 2012

Knitting and Stitching Harrogate, 2012


All I actually bought was some thread that I'd just about run out of, and a headpiece / fascinator block (from the Milliner Warehouse stand).  Most of what they had was aimed at the 'make a fascinator in a day / make your own' crowd - pre blocked shapes that just needed to be trimmed (not that there's anything wrong with that, just not currently my thing).  They had some nice feathers, just nothing that inspired me to buy.  I am going to get some stuff from their website though - they have some nice large wool felt capelines (wide brims), that I think might give the scope to do something really interesting free-form.  

Anyway - the block is a nice little vintage-y shape, and dead easy to block (I have already), though the getting off the block will take some time.  And it's just the right size for using up those middle bits you get left with when blocking brims.

new headpiece block in use, using up one of those left over 'middle bits'

new block underside - may be tricky to remove the felt, but should be nice shape


The show also got me thinking about the self editing of your work.  I've had a theory for quite a while, that I've put into practise (or tried to) with my costuming work.  It's not complicated, it's basically just that you should be careful about what work you present to the world at large.

What got me thinking about that was an item of costume on another stand.  I'm not going to go into any more detail about who or what, because that wouldn't be fair to the maker.  But it was a mess.  The cut was completely off, in a number of areas; things didn't hang the way they should (including in the photo of it on a person); the finish was poor; the attention to detail was lacking...  it was just basically bad.  It was the sort of work that if I presented it to a client as a finished piece, it would be thrown back in my face, and they'd be demanding a full refund, and refusing to pay.  And I have to say they'd be right.  

As a result of seeing it I started thinking about the way that I've been editing my work for a long time.  Everybody has off days.  Everybody who makes things sometimes makes things they're not happy with (quite frequently if you have perfectionist tendencies!) - things that just don't work - if you make things for other people you'll occasionally end up making something that you hate with a passion.  And, yes, sometimes you might make things that you don't think are good enough - or sometimes things that are absolutely stunning and some of your best work, and your photos are dreadful.

Quite simply, you don't put those things on display, or on a website.  You self-edit the front that you present, so that the work that people see is the best that there is to show them (and ideally, so that it's the stuff you'd be happy to make more of).  

I have to be generous and assume that there was a problem with getting stuff to display for some reason (aside from the fact that there were similar issues with other things that were displayed in photos).

Of course, you can go too far in the opposite direction - there was another stand that only had one piece displayed.  I know all about the gallery theory of having a large space, and lots of room to move around exhibits, and the piece itself was stunning, but the stand just looked unfinished.

Ouch, is too late now, and I have more to type up, so I'll have to finish tomorrow (by which time I'll have even more to write about)!


Tuesday 27 November 2012

Black Hat, and Oops!! (Catch up)

It's been far too long since I actually typed anything up for my college diary, rather than scribbling it onto a scrap of paper, and shoving it into a box or bag.
Easily put down to a few weeks of hundred hour working weeks, and the recovery from that, but I've decided to get caught up from that now, (and possibly in the next couple of posts), in no real order, and at the same time to write about what I'm currently doing.  On any posts that are me catching up on typing up of previous notes, I'll add 'catch up' in the title line, as I have here.


Anyway, I was up to the black hat.

After I did the picture research (see Pinterest board mentioned in previous post), I found that two pictures got stuck in my head.

Source: http://blogs.warwick.ac.uk/zoebrigley/entry/julia_kristevas_black/

Source: http://www.scientificamerican.com/article.cfm?id=black-stars-not-holes


The next week at college, we had a workshop.  Sharon brought us a box of scraps and offcuts of felts to play with.  I pulled out a reasonably sized piece of pink felt, and started cutting into it - just freehand with a pair of snips - to see what would happen.  I did that before I blocked it, because I wanted to see what would happen after the felt was stretched over a block.

I then steamed it and stretched it over a dolly head, and pinned it in place, and it ended up looking like this:


I really like this effect.  And although I didn't go on to use it in the finished hat in quite the same way, (possibly because it's safer to cut the holes afterwards - more controlled and therefore less scary), I think I am going to try to use it on a finished piece at some point.

I decided that I wanted the final hat to be a bit more sparkly, and to play with different textures - I deliberately avoided looking at the pictures again, to see what would happen if I relied solely on my memory of them.

I also decided that I'd use a leather punch to cut the holes, after blocking, to get more even circlular holes.


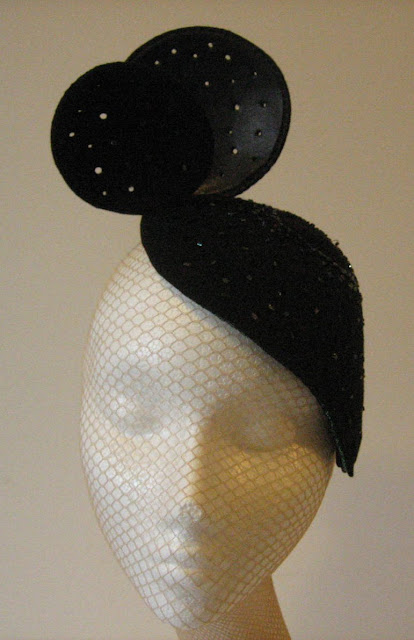
In the end, I made a hat incorporating leather, holographic dance fabric, and beads, as well as the felt, and used a buckram foundation.

I blocked a piece of buckram on a dolly head, and drew out my shape on it, and wired the edge.  Then I stretched a piece of the dance fabric (a four way stretch jersey) over the buckram, and tacked it into place.  Originally I tried to block the dance fabric under the felt, and tack it to the felt, but that was a disaster, as the fabric simply 'unstretched' away from the felt and - well, big mess!

After blocking the same shape in the felt, I cut a large hole in the centre of the shape.  I added a panel of leather (suede side up) over the corresponding area of the buckram / dance fabric.

Out of the felt that was left, I blocked (using dome-ish shaped blocks, or parts of blocks that I pulled out of the cupboard) two bits of felt, and two of leather, to a slight dome.   On one of these the leather was face out, and on the other the suede was.

I then punched holes into the felt layer of the main part, in no particular order, other than getting smaller, and more spaced out as they spread out from the centre.  I attached the felt layer to the others, leaving the edge of the felt raw (but filed with an emery board to neaten), and tucking the dance fabric around the buckram to neaten the edge.  I also added lots of black and iridescent rocaille beads (sewn on).

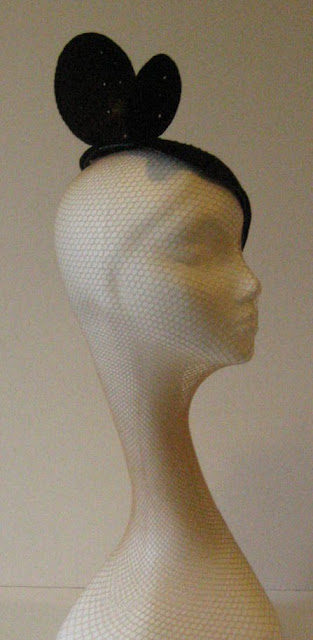
I made up the two smaller domed pieces, and punched holes in them - all the way through both layers this time.  I had to use some glue to hold them, partly to avoid the stitches going through the leather and partly because the layers pulled apart when punched.  I wired the edges of the felts before adding the leather.


I wanted the smaller pieces to stand up away from the main part, but I found that stitching alone was unsecure - they were wobbling about too much.  So I removed them, and added a wire support:


I'm really happy with this hat - I don't know what it is, I just really like the shape - even in spite of the fact that  can see a certain 'Minnie Mouse'-ishness about it!  (If anybody puzzles about that, I have a feeling that a pair of round circles as headwear should be, in theory, as unusable as the phrase 'who you gonna call'.)


Anyhow, the hat:


Sunday 23 September 2012

Progress on black hat, and other stuff...

So I have done some research on the internet for my black hat - lots of info on dark stars, and dark matter, and normal stars, and lots of pictures of starscapes and outer space on the Pinterest board (and some random pictures of nails and things that came up on google image, that I thought were interesting or kind of cool).  http://pinterest.com/debbielough/black-hat/

I'm still a little jumbled on it though - I have some very vague, half formed ideas, but no picture in my head as yet.  I've been reading some books on branding and 'how to design a collection' for this years college work proper, and I think I need to pick a market to aim for - so I think I'm going to look at the Goth / Burlesque markets - Goth obviously comes up as a thing when you search on 'black', and I'm off to see a friend in a Burlesque show at the end of next month, so it all fits - and it may help to focus me a bit.


The other stuff... I finally got some decent pictures of most of my hats to date, so I'm just in the process of cleaning them up, and I'll add a gallery page to this blog.


Friday 21 September 2012

'Design and Make a Black Felt Hat'

First project of the year...

To get us into the swing of the whole 'set your own brief', 'do the research', 'design something' thing, we have  three weeks (including this week) to set a brief, research, design and make a black felt hat.

We've each been given one felt hood (a cone).

This is what it starts out looking like (though these are the ones I used for my Russian hat last year) :


I've started straight away, thanks to my trusty laptop, which I had with me at college this week.  The first thing that struck me about the black felt thing was the word 'black'

So I googled "black".

The first hit was Wikipedia.  The first info on Wiki was an outline of the etymology of the word 'black'.  This is what it said:
"The word black comes from Old English blæc ("black, dark", also, "ink"), from Proto-Germanic *blakkaz ("burned"), from Proto-Indo-European *bhleg- ("to burn, gleam, shine, flash"), from base *bhel- ("to shine"), related to Old Saxon blak ("ink"), Old High German blah ("black"), Old Norse blakkr ("dark"), Dutch blaken ("to burn"), and Swedish bläck ("ink"). More distant cognates include Latin flagrare ("to blaze, glow, burn"), and Ancient Greek phlegein ("to burn, scorch"). Black supplanted the wonted Old English word sweart ("black, dark"), which survives as swart,swarth, and swarthy (compare German schwarz and Dutch zwart, "black")."  
(Source http://en.wikipedia.org/wiki/Black)

It then goes on to talk about the scientific aspects of the word - how black is created when there is no visible light to reach the eye, and about how black objects absorb more light than any others.  Also, that if equal parts of the three primary colours (red, blue, yellow) are mixed together, they collectively reflect so little light that they can be called black.

It then discusses black as a sign of authority, academia, anarchism, mysticism, subcultures (goths, heavy metal, punk, etc).


The words were the thing that struck me most - along with the idea of the absorption of light.  The words that I specifically pulled out of the above paragraph, as either standing out, or as being repeated were:

INK  
DARK
BURN
SHINE

I made a sort of brainstorm mind-map thing, with each word at the centre, and I kept coming back again to the idea of stars, and of sun.  Thinking about that alongside the absorption of light led me to the idea of stars going out.


My thoughts then progressed as follows (this is a direct transcription of the stream-of-consciousness notes in my sketchbook):

Shine.
Dark.
Burn.
Sun is a star.
Stars are dots of light.
Stars are suns.
Stars are burning balls of gas.
Darkness if sun goes out.
Darkness if stars go out.
Stars shine through the sky.
Without stars the sky would be black.
Without sun the world would be black.
STARS
SUN

So that's the concept for the hat.  Stars and Darkness.


Of course, I currently have no idea what on earth that means!  But at least I've got the first part of the project nailed, and have set my brief.


The next part is to research the concept.  I've set up a Pinterest board for my pictorial internet research - I'll link to it from every post if I've added to it - so here is the link http://pinterest.com/debbielough/black-hat/


Progress...

(and normal service will shortly be resumed - i.e. there'll be some pictures, after a couple of text heavy posts).


Thursday 20 September 2012

Back at college...

Yesterday was our first day back at college.  I'm all re-registered, and paid up (till Christmas, anyway).

Most of the work this year will be gearing up for our final collections, to be shown in the end of year show / exhibition next summer, when the college gets turned into a gallery for a week.   So yesterday was all about putting a collection together, and how to do the research involved in that.

We have to keep a research diary - mine will be this blog, in conjunction with Pinterest boards that I'll link to.  As the 'summer collections' from last year are now done, and all marked up, I'm going to archive the bibliography page for that by copying all of the information to a blog post (in case anybody finds it interesting).  I'm also going to move the links to my 'summer collection' Pinterest boards to the same blog post.  That way I'll have the space to add links to the boards I'm using for the collection this year, and to add a bibliography page for that (a bibliography is not in the brief, but it'll help keep me on track in terms of what I've looked at).

I still haven't firmly decided what I'm going to be researching for my collection.  I've been looking at fossils and geology...  There's a museum in Newcastle - now the 'Great North Museum: Hancock', though to me it'll always be The Hancock Museum - in which I practically lived when I was a kid.  We went there over the summer, when we were at home for a family party, and it's changed a lot - but I still recognised most of the exhibits!  It has lost something of what it once was - it's a bit more generic now than it used to be - but there is a lot more of the geological collection on display.  Photos, etc, to follow!

At the same time, I've been looking through my books at ways that fabric was manipulated in history - through plaiting, twisting, cutting, stamping, heat stamping, slashing, pleating, etc.

And there's an advertising picture that really caught my eye in a magazine of Ralph Lauren's A/W collection - very 20s/30s country house, but updated by using modern cuts, and mixing up leathers and tweeds and animal prints.  Again, I'll share pics in the next couple of days, once I've found them!

As I write I have no idea of the direction in which this will take me.

Meanwhile, we've been given a mini-brief, to design a black felt hat - more of which in my next post!!


Bibliography for 'Summer Collection' 2012.

This is the archive of my research bibliography for the project from last (academic) year.  I'm going to be using the bibliography page for research for my final collection, so I'm putting this to one side!

The 'summer millinery' Pinterest board is here:
 http://pinterest.com/debbielough/summer-millinery/

The '1920s' Pinterest board is here:
http://pinterest.com/debbielough/1920s/


Bibliography of websites looked at, and books used in research (broken down roughly by subject area).

Please note that this is a complete bibliography - some I have read either all the way through, or the relevant chapters - others I may only have looked at two or three pictures, or a read a couple of paragraphs.  The ones I have used most are in bold text.


Historical / period research

Through the Looking Glass: A History of Dress from 1860 to the Present Day
    Elizabeth Wilson and Lou Taylor - BBC - 1989

A Hat Maker Remembers: A Conversation with John Reed-Crawford.
    Recorded and transcribed by Debbie Henderson, 25 July 1994.
    Costume: The journal of the costume society - No 32 - 1998

Fifty Hats That Changed the World
    Robert Anderson - Conran Octopus Ltd - 2011

The Emancipation of Women
    D C Brooks - Macmillan - 1970

Gillard D (2011) Education in England: a brief history
www.educationengland.org.uk/history

RESEARCH PAPER 99/111 - 21 DECEMBER 1999
A Century of Change: Trends in UK statistics since 1900

www.theglasgowstory.com

www.wiganworld.co.uk

translate.google.com

The Cut of Women's Clothes: 1600 - 1930
    Norah Waugh - Faber - 1968 (1994 reissue)

The Visual History of Costume Accessories: From Hats to Shoes: 400 Years of Costume Accessories
    Valerie Cumming - Batsford - 1998

Dress and Morality
    Aileen Ribeiro - Batsford - 1986

Haute Couture
    Richard Martin & Harold Koda - Metropolitan Museum of Art - 1995

Dressmakers in Worthing, 1920 - 1950
    Ann Wise - Costume (the journal of the costume society) - No 32 - 1998

Hats: A History of Fashion in Headwear
    Hilda Amphlett - Dover - 1974

youtube.com

hullcc.gov.uk/museumcollections

collections.vam.ac.uk

metmuseum.org

www.wikipedia.com

digital.library.wisc.edu/1711.dl/HumanEcol.MillineryBooks

costumegallery.com

britishpathe.com

A Shriek in the Night (film - director Albert Ray) - 1933

Be Yourself (film - dir Thornton Freeland) - 1930

A Star is Born (film - dir William A Wellman) - 1937

The Amazing Quest of Ernest Bliss (film - dir Alfred Zeisler) - 1936

The Thirteenth Guest (film - dir Albert Ray) - 1932

The Young in Heart (film - dir Richard Wallace) - 1938

http://en.wikipedia.org/wiki/Chiaroscuro

http://tvtropes.org/pmwiki/pmwiki.php/Main/Chiaroscuro

Pandora's Box (Die Büchse der Pandora) Dir George W Pabst - 1929

Diary of a Lost Girl (Tagebuch einer Verlorenen)  Dir George W Pabst - 1929

Nosferatu (Nosferatu, eine Symphonie des Grauens)  Dir F W Murnau - 1922

Metropolis - Dir Fritz Lang - 1927


Muse
www.youtube.com

www.pandorasbox.com


Summer Millinery
The Cutting Edge: 50 Years of British Fashion 1947 - 1997
   Amy de la Haye (Ed) - V&A - 1996

Hats: Make Classic Hats and Headpieces in Fabric, Felt and Straw.
    Sarah Cant - Black - 2010

www.enokiworld.com

fashion.telegraph.co.uk

vanityfair.com

harpersbazaar.co.uk

madhattery.royalroundup.com

www.judybentinck.com

www.vogue.co.uk

fashiontrendsetter.com

mirror.co.uk

google.com (image search)

piroskawolf.blogspot.com

missdelite.blogspot.com

tomandlorenzo.com

sbeulah-blog.onsugar.com

gofugyourself.com

theluxuryemporium.ie

sallyannprovan.co.uk

ginafoster.co.uk

janetaylormillinery.com

racheltrevormorgan.com

en-gb.lovehats.com/shop

nigelrayment.co.uk

stephenjonesmillinery.com

piphackett.co.uk

williamchambers.co.uk


And via Pinterest:
renoirgallery.com

bhldn.com

voguepatterns.mcall.com

acertaincinema.com

pinterest.com

NB - I have also looked at some images on Pinterest that are not credited to their original source.

Saturday 15 September 2012

Creative people...

A friend found this blog post and posted it to Facebook.  I thought I'd post it here, because I think it's cool.

(And it also made me feel a little better about my easily-bored-ness, and my dislike of 'rules', and my constant questioning 'why' about everything...)


http://bravegirlsclub.com/archives/14412

Wednesday 29 August 2012

My Nana


This has been a really difficult day for me. I wasn't sure I should post this, but I've accomplished b***** all else today, so I thought I may as well.


My Nana was the closest thing I ever had to a real mother.

She brought me up and took care of me all my life. 

She was kind, gentle, never laid a hand on me. She taught me to read, to cook, to sew, to dance, taught me that all people were equal, and gave me an incredibly strong morality. 

She lived through the Great Depression, World War Two when she worked in a munitions factory, took care of her mother until she died (when Nana was 16), had pleurisy, had pneumonia four times, took care of her husband (my Grandad) when he was dying from lung cancer, raised three children of her own, a score of foster kids, and me.

Then without warning, when she was 72, and I was 17, I watched her die suddenly. One minute she was talking to me, and the next she was dead.

That was 20 years ago tonight (at about 9.02pm BST).


So I just want to say, in this post that has absolutely nothing to do with sewing, or with my work, or with hatmaking, if you love somebody, even if you don't always get on, talk to them. Tell them you love them. Give them a hug. Spend some time together. Because it takes just one second for them to be gone forever.


And I love you Nana, and miss you forever.


My Nana and Grandad - Gertrude [Trudi] (1920-1992) and George Lough (1920-1977)

Wednesday 15 August 2012

Bridal Hat

It's been a while since I posted - work deadlines...

Now then, I recently made a hat for a friend to wear for her wedding.  We'd agreed on a nice white (off white really) fur felt velour, so I could brush it up nicely, and that it would be an undersized, or mini, top hat.

I don't have blocks for a mini top hat, so I created my own.  For the brim I used one of the polystyrene (styrofoam) rings that you can get for craft work.  My first attempt didn't work, because as soon as I tried to block the felt over it, it snapped into three pieces.
I taped it back together with electrical (insulation) tape, and paper mache-d over it to give it some strength for the blocking, and it worked brilliantly (and I could pin into it).  Then I just drew on  my brim shape with tailor's chalk.  Best part - I can now use this again for a small brim, or as a flat beret block.

I also didn't have a block the right shape for the crown - for this I used expanding builder's foam, sprayed into a clean plant pot, and carved to shape, then papered over the top.  This was a bit less successful (only because I was being picky about the shape - I wanted the sides to curve in - obviously that would normally require a 'puzzle' or segmented block.  I haven't yet worked out how to do that in the foam (am sure it's possible).  Anyway, I wasn't 100% happy with the shape, so I cut some sections out of the base, and effectively sewed darts into the felt.  Much better!  This would have worked even if the main part of the hat hadn't been hidden by the fabric drape, because of the pile of the velour felt, but I'd have had to be more careful about my stitching being concealed than I was.

My friend sent me a box stuffed with goodies that she'd collected - braids, brooches, necklaces, fabrics from her wedding dress, etc, etc.  The stipulations she made was that I had to use the rabbit's foot, for luck, and that I should 'load it up', because she doesn't 'really do less is more'.

So I did.  I sent her several sketches, and she picked the bits she liked from each, and asked for a couple of changes.  And I got to work on putting it all together.

The first set of  pictures are the ones I took, which show the detail from all angles, but not the colours (for some reason my photos glared).  The second set are pictures that guests at the wedding (I couldn't be there due to a clash with a family wedding) have incredibly kindly allowed me to use (credits below the photos).

My favourite part of the whole hat is the hot air balloon earring / pin!


Photo used by kind permission of Liz Hanley

Photo used by kind permission of Christine Simpson


As I said, I couldn't be at the wedding, but it looked completely fabulous, and I'm sorry I had to miss it.

I also wish the 'happy couple' all good things for the future.