Friday, 30 November 2012

Jewellery Inductions and Workshops.

Week One: Metals (specifically copper).


We're having our inductions into the jewellery (or jewelry, if you're American!) workshops for the next couple of weeks.  

I've been looking forward to this part of the course!

This week we were looking at things you can do with copper - and the processes you go through to use it.  These apply to most of the metals we might choose to use, but copper is relatively cheap, obviously, so good for practising and potentially mucking up.


First we used the torches to anneal the metal (i.e. heat it till it glows).  That alters the molecular structure of the metal, making it soft enough to work with.  Then you quench it with water (some metals have to be allowed to cool slowly, I've read since, but copper is fine quickly cooled in a bowl of water).  It's amazing how quickly the water makes the metal going from glowing so hot that it would burn you, to cold to the touch, just by dunking it into a bowl of cold water.


M. annealing her metal.


Then we 'pickled' the metal in a tub of weak sulfuric acid solution to remove (or in some cases partially remove) any blackening and charring caused by the flame, that might stain the metal when working on it (if making a final piece you'd be more careful to remove it all, obviously, unless you wanted actually to keep some), and the metal was ready to work with.

The annealing and pickling makes the copper turn a really pretty shade of pink.


When we finished with the metal, Liz, the tutor, showed us the various tools, and some of the processes that you can use on the metal.  The main ones were the letter and number punches, the metal rollers, and what I called, when I got home, the 'domey-blocky-thingy' (actually a doming / dishing block).  

The thing that caught my interest first was the metal rollers.  High pressure steel rollers, operated by hand, and a bit like a pasta machine, in that by gradually tightening the rollers, and re-rolling the metal through them, you can stretch and thin the metal.  Apparently down to foil-like thinness.

The word that caught my attention, though, was 'embossing'.  By rolling the annealed metal through the machine with another material laid on (or under) it, you can impress the design of the other material onto the surface of the metal.

I spent most of the next part of the session embossing things.  Here are my results:

I used a different material on each side of this piece - on this side, the spine-like design was pressed into the metal by a piece of paper cut to that shape.

On the back of the 'spine' piece I used a piece of hessian - the hessian was completely destroyed by the pressure of the machine, but I really like the use of the two together.


I laid a piece of sequin waste (the foil-y stuff with the holes in it) over this piece.  

The back of the sequin waste piece - I like this side as much as the 'right' side - the texture is a lot different.

I love this piece.  This pattern came from a skeleton leaf.  I thought it was amazing that something so fragile and delicate could leave such a clear impression on a piece of metal.

I embossed this one with a piece of lace (before I cut out the discs).  Not such a clear impression this time,  but I think it looks a bit like bark.  One of my classmates later coloured a similar patterned piece black, and lightly sanded the surface, and it looked incredible.


Next up came the jewellery saws and the drill.  

The saws are a bit - well, a lot - like woodworking coping saws, except that if you want to turn you turn the work, not the blade.  You have to turn the work and not the blade, because the blades are so delicate and fine that if you try to turn them, they snap pretty much straight away.  As I very quickly found out....  Twice....  

I found the sawing to be quite difficult - I'm used to sawing more substantial things where you have to put pressure onto the blade - with this, if you apply any pressure, the blade sticks, and snaps.  The key is to relax, and let the teeth of the blade do all the work.  I started to get the hang of it.

The drilling, to get a start point for cutting shapes out of the metal was much easier.  The drill even has a foot pedal to operate it, just like a sewing machine, so that was much more familiar!

I didn't draw a shape onto my metal, just randomly cut bits off / out:

My randomly cut piece of copper.


Next up was soldering.  Now I have soldered before.  I (very briefly) took electronics at school, and my Dad was a bit of an electronics geek, so he taught me how to solder.  But jewellery soldering is completely different.

For a start, you use silver solder, not soldering wire, so that you don't lose the hallmarking of pure silver on a silver piece of jewellery.  For another, this way is stronger.

So, we mixed up a bowl of borax, which comes in a cone like sugar in the 18th century, and which you grind with water to a paste that looks like milk.  The you squash the silver solder in the roller, and cut it up into teeny pieces, which you drop into the borax bowl.  

My bowl of borax solution, cone of borax, and squashed piece of silver solder.

Then to brush the borax solution over the surfaces to be bonded, and use the paint brush to add little bits of solder along the seam.

The solder will melt into the seam, and the borax stops the surfaces from carbonising and getting nasty mucky-looking staining stuck in the soldering, where you can't get at it to remove it.


M. heating her soldering

E. melting her solder.

And then it's back into the pickle pot.  This is how mine turned out (bit rubbish, but an ok first attempt at something that's a lot trickier to do than you think it will be).


My little mini soldered table!

Looks ok this side.

Bit of a mess of dodgily applied solder on this side, although I think it's because it moved when I put it onto the hearth.


That was pretty much the end of the day, but I didn't have to go for a while, so I caught up on some stuff I didn't have time to do earlier.

I stretched a piece of copper in the roller - the one on the right started about the same size as that on the left.

I cut out some discs (after getting the die stuck, because it didn't occur to me to take it out  the bottom (duh)).

I used the 'blocky-domey-thingy to hammer out some discs into domes.

I used the domey-blocky-thing to hammer out a couple of domes on patterned metal - using wooden tools on one (right), and steel tools on the other (left), to see what the difference would be.  ( I knew already that wooden ones protect the pattern, because the wood is softer, but I wanted to see for myself what the difference is.)


I think the thing that most caught my imagination through the whole day was the roller.    The whole concept of pressing a design into the surface of the metal, and the idea of rolling it to whatever thickness you want it to be.  But I think that the embossing (or a combination of thinning and embossing) might have possibilities I should think about for my final collection - some of the results make me thing of fossils quite a lot - and the one with lace reminds me of some fossilised tree bark...


Definitely a worthwhile and interesting day.  Can't wait for plastic next week!

Wednesday, 28 November 2012

The Knitting and Stitching Show, and some new hats.

I went to the Knitting and Stitching show at Harrogate last Saturday.  I worked in the college stand for a few hours, and then had a brief look around.  

There were a handful of stands that I wanted to look at / needed to get some supplies from, so I didn't spend that much time aimlessly wandering about, unlike at last years show.  The things that struck me, and that when I have time I'd like to try playing with, were some of the massive hanks of thick yarns, or textured yarns.  I think that you could do something really interesting with those (but I need a little practise first!).

Hats on display at Knitting and Stitching Harrogate 2012 (mine are the cloche, the black leather one, and the barely visible black suede one at the back). 

Hats on display at Knitting and Stitching Harrogate, 2012 (the cloche, leather and feathers, and the black suede at the back are mine).


The college stand at Knitting and Stitching Harrogate, 2012

Knitting and Stitching 2012

Knitting and Stitching 2012

Knitting and Stitching Harrogate, 2012


All I actually bought was some thread that I'd just about run out of, and a headpiece / fascinator block (from the Milliner Warehouse stand).  Most of what they had was aimed at the 'make a fascinator in a day / make your own' crowd - pre blocked shapes that just needed to be trimmed (not that there's anything wrong with that, just not currently my thing).  They had some nice feathers, just nothing that inspired me to buy.  I am going to get some stuff from their website though - they have some nice large wool felt capelines (wide brims), that I think might give the scope to do something really interesting free-form.  

Anyway - the block is a nice little vintage-y shape, and dead easy to block (I have already), though the getting off the block will take some time.  And it's just the right size for using up those middle bits you get left with when blocking brims.

new headpiece block in use, using up one of those left over 'middle bits'

new block underside - may be tricky to remove the felt, but should be nice shape


The show also got me thinking about the self editing of your work.  I've had a theory for quite a while, that I've put into practise (or tried to) with my costuming work.  It's not complicated, it's basically just that you should be careful about what work you present to the world at large.

What got me thinking about that was an item of costume on another stand.  I'm not going to go into any more detail about who or what, because that wouldn't be fair to the maker.  But it was a mess.  The cut was completely off, in a number of areas; things didn't hang the way they should (including in the photo of it on a person); the finish was poor; the attention to detail was lacking...  it was just basically bad.  It was the sort of work that if I presented it to a client as a finished piece, it would be thrown back in my face, and they'd be demanding a full refund, and refusing to pay.  And I have to say they'd be right.  

As a result of seeing it I started thinking about the way that I've been editing my work for a long time.  Everybody has off days.  Everybody who makes things sometimes makes things they're not happy with (quite frequently if you have perfectionist tendencies!) - things that just don't work - if you make things for other people you'll occasionally end up making something that you hate with a passion.  And, yes, sometimes you might make things that you don't think are good enough - or sometimes things that are absolutely stunning and some of your best work, and your photos are dreadful.

Quite simply, you don't put those things on display, or on a website.  You self-edit the front that you present, so that the work that people see is the best that there is to show them (and ideally, so that it's the stuff you'd be happy to make more of).  

I have to be generous and assume that there was a problem with getting stuff to display for some reason (aside from the fact that there were similar issues with other things that were displayed in photos).

Of course, you can go too far in the opposite direction - there was another stand that only had one piece displayed.  I know all about the gallery theory of having a large space, and lots of room to move around exhibits, and the piece itself was stunning, but the stand just looked unfinished.

Ouch, is too late now, and I have more to type up, so I'll have to finish tomorrow (by which time I'll have even more to write about)!


Tuesday, 27 November 2012

Black Hat, and Oops!! (Catch up)

It's been far too long since I actually typed anything up for my college diary, rather than scribbling it onto a scrap of paper, and shoving it into a box or bag.
Easily put down to a few weeks of hundred hour working weeks, and the recovery from that, but I've decided to get caught up from that now, (and possibly in the next couple of posts), in no real order, and at the same time to write about what I'm currently doing.  On any posts that are me catching up on typing up of previous notes, I'll add 'catch up' in the title line, as I have here.


Anyway, I was up to the black hat.

After I did the picture research (see Pinterest board mentioned in previous post), I found that two pictures got stuck in my head.

Source: http://blogs.warwick.ac.uk/zoebrigley/entry/julia_kristevas_black/

Source: http://www.scientificamerican.com/article.cfm?id=black-stars-not-holes


The next week at college, we had a workshop.  Sharon brought us a box of scraps and offcuts of felts to play with.  I pulled out a reasonably sized piece of pink felt, and started cutting into it - just freehand with a pair of snips - to see what would happen.  I did that before I blocked it, because I wanted to see what would happen after the felt was stretched over a block.

I then steamed it and stretched it over a dolly head, and pinned it in place, and it ended up looking like this:


I really like this effect.  And although I didn't go on to use it in the finished hat in quite the same way, (possibly because it's safer to cut the holes afterwards - more controlled and therefore less scary), I think I am going to try to use it on a finished piece at some point.

I decided that I wanted the final hat to be a bit more sparkly, and to play with different textures - I deliberately avoided looking at the pictures again, to see what would happen if I relied solely on my memory of them.

I also decided that I'd use a leather punch to cut the holes, after blocking, to get more even circlular holes.


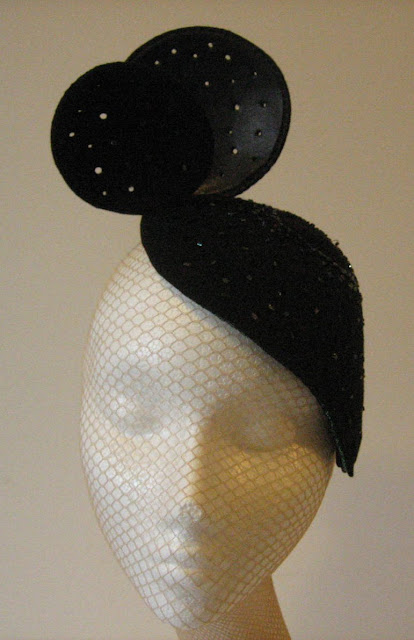
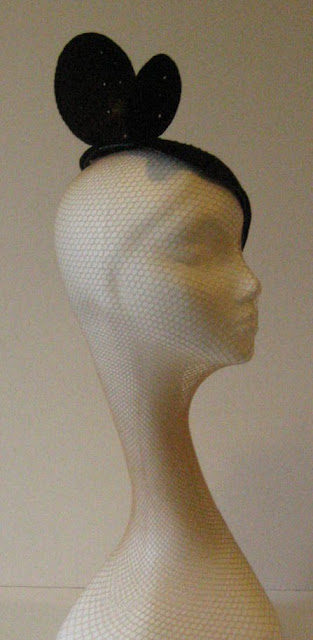
In the end, I made a hat incorporating leather, holographic dance fabric, and beads, as well as the felt, and used a buckram foundation.

I blocked a piece of buckram on a dolly head, and drew out my shape on it, and wired the edge.  Then I stretched a piece of the dance fabric (a four way stretch jersey) over the buckram, and tacked it into place.  Originally I tried to block the dance fabric under the felt, and tack it to the felt, but that was a disaster, as the fabric simply 'unstretched' away from the felt and - well, big mess!

After blocking the same shape in the felt, I cut a large hole in the centre of the shape.  I added a panel of leather (suede side up) over the corresponding area of the buckram / dance fabric.

Out of the felt that was left, I blocked (using dome-ish shaped blocks, or parts of blocks that I pulled out of the cupboard) two bits of felt, and two of leather, to a slight dome.   On one of these the leather was face out, and on the other the suede was.

I then punched holes into the felt layer of the main part, in no particular order, other than getting smaller, and more spaced out as they spread out from the centre.  I attached the felt layer to the others, leaving the edge of the felt raw (but filed with an emery board to neaten), and tucking the dance fabric around the buckram to neaten the edge.  I also added lots of black and iridescent rocaille beads (sewn on).

I made up the two smaller domed pieces, and punched holes in them - all the way through both layers this time.  I had to use some glue to hold them, partly to avoid the stitches going through the leather and partly because the layers pulled apart when punched.  I wired the edges of the felts before adding the leather.


I wanted the smaller pieces to stand up away from the main part, but I found that stitching alone was unsecure - they were wobbling about too much.  So I removed them, and added a wire support:


I'm really happy with this hat - I don't know what it is, I just really like the shape - even in spite of the fact that  can see a certain 'Minnie Mouse'-ishness about it!  (If anybody puzzles about that, I have a feeling that a pair of round circles as headwear should be, in theory, as unusable as the phrase 'who you gonna call'.)


Anyhow, the hat: